When thrust into a wilderness survival situation, the initial shock can be paralyzing. However, your best tool isn’t a fancy gadget; it’s your mind and your knowledge. The wilderness, far from being an empty void, is a complex ecosystem teeming with resources. The key to survival lies in understanding how to identify, access, and safely utilize these resources. This isn’t about thriving, but about sustaining yourself until rescue or self-extraction is possible.
This guide will break down the essential strategies for finding water, sourcing edible food, and constructing protective shelter, equipping you with the foundational skills to face the challenges of the wild.
1. The Survival Mindset: Your Greatest Asset
Before any physical action, mental fortitude is paramount. Panic is the enemy of survival.
Key Points:
- Positive Mental Attitude (PMA): Believe you will survive. Despair leads to inaction.
- Prioritize: Follow the “Rule of Threes”:
- 3 minutes without air
- 3 hours without shelter in extreme conditions
- 3 days without water
- 3 weeks without food
- Explanation: This hierarchy helps you focus on the most immediate threats.
- Assess, Improvise, Adapt: Quickly evaluate your situation and resources. Be creative with what you have. Be flexible when plans change.
- Stay Put (Initially): Unless you know exactly where you are and rescue is impossible from your current location, stay near your last known point or where help might expect to find you. Signal for help.
- Explanation: Your mental state dictates your ability to think clearly, make rational decisions, and persevere through challenges. Panic burns energy and impairs judgment.
2. Water: The Immediate Priority
Clean drinking water is non-negotiable for survival. Dehydration can begin in hours.
Key Points:
- Finding Water Sources:
- Listen: Follow the sound of running water.
- Look for Greenery: Lush vegetation often indicates proximity to water.
- Follow Animal Tracks: Animals know where water is.
- Depressions/Low Points: Water collects in valleys, ravines, and low-lying areas.
- Dew: Collect dew in the mornings by wiping it off plants with an absorbent cloth.
- Rainwater: Collect in tarps, leaves, or any container.
- Snow/Ice: Melt and purify snow or ice. Avoid eating it directly, as it lowers core body temperature.
- Solar Still (Last Resort): Dig a pit, place a container in the center, cover with plastic sheeting and a small rock to create condensation. Less efficient but can work.
- Water Purification Methods (Always Purify!):
- Boiling: The most reliable method. Boil water vigorously for at least 1 minute (3 minutes at high altitudes).
- Explanation: Kills most bacteria, viruses, and parasites. Use a metal container (your survival kit cup, a clean tin can).
- Filtering (Physical): Create an improvised filter with layers of cloth, sand, charcoal, and gravel. This removes sediment, but does not purify. Always follow with boiling or chemical treatment.
- Explanation: Makes water clearer, but not necessarily safe to drink.
- Chemical Treatment: Use purification tablets (iodine or chlorine dioxide) from your kit. Follow instructions carefully.
- Explanation: Effective for killing pathogens, but may leave a taste.
- Solar Disinfection (SODIS): Fill clear plastic bottles with water and expose them to direct sunlight for 6 hours (sunny) or 2 days (cloudy).
- Explanation: UV radiation kills pathogens. Requires clear bottles and sun.
- Boiling: The most reliable method. Boil water vigorously for at least 1 minute (3 minutes at high altitudes).
Explanation: Never drink untreated water from the wild, even if it looks clear. Contaminated water can cause severe gastrointestinal illness, rapidly leading to dehydration and weakness, making rescue or self-extraction nearly impossible.
3. Food: Sustainable Nourishment (Lower Priority than Water/Shelter)
You can survive for weeks without food, but sustained activity requires energy. Prioritize easy-to-identify and low-risk options.
Key Points:
- Universal Edibles (Safe Bet):
- Grasshoppers/Crickets: Abundant, high in protein. Cook them to kill parasites.
- Ants/Termites: Common, protein-rich.
- Fish: If near water, fish can be caught with improvised lines, nets, or traps.
- Frogs/Snakes: Require careful identification and preparation to avoid poisonous species. Cook thoroughly.
- Grubs/Larvae: Found in decaying wood or under rocks, often high in fat and protein.
- Foraging (Extreme Caution!):
- “Universal Edibility Test” (Last Resort & NOT Recommended for Beginners): This involves a multi-step, time-consuming process to test small amounts of unknown plant parts. It is dangerous and should only be used if starvation is imminent and no other food source is available.
- Explanation: Many plants are poisonous. Misidentification can be fatal. As a beginner, avoid eating wild plants unless you are 100% certain of their identification.
- Familiar Plants: Stick to plants you know are edible (e.g., dandelions, specific berries if you are local and highly familiar with them, wild garlic).
- Parts to Avoid: Generally avoid mushrooms (high risk of deadly species), milky saps, bitter tastes, and plants with an almond smell.
- “Universal Edibility Test” (Last Resort & NOT Recommended for Beginners): This involves a multi-step, time-consuming process to test small amounts of unknown plant parts. It is dangerous and should only be used if starvation is imminent and no other food source is available.
- Trapping & Snaring: Learn basic snare-making techniques for small game (rabbits, birds). Requires patience and practice.
- Explanation: Passive hunting method that conserves energy.
- Explanation: The focus is on energy and protein. Wild foraging is risky for beginners due to the high number of poisonous species. Focus on insects, small game, and fish first. Always cook animal protein thoroughly.
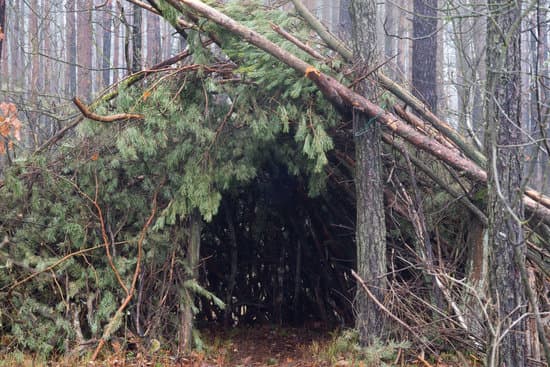
4. Shelter: Protection from the Elements
Shelter is critical for regulating body temperature (preventing hypothermia or heatstroke) and for psychological comfort.
Key Points:
- Location, Location, Location:
- Flat, Dry Ground: Avoid depressions where water can collect.
- Wind Protection: Use natural windbreaks (large rocks, dense trees).
- Proximity to Resources: Near water and firewood.
- Safety: Away from potential rockfalls, dead trees, or animal trails.
- Types of Improvised Shelters:
- Lean-to: Simplest, but only protects from one side. Requires a sturdy branch or fallen tree.
- How: Lean branches against a support, cover with leaves, pine needles, or a tarp.
- Debris Hut (Best for Warmth): More effort, but provides excellent insulation.
- How: Build a sturdy frame (ridge pole supported by a branch or tripod), then pile a thick layer (at least 2-3 feet) of leaves, grass, pine needles over it.
- Snow Cave/Quinzhee: For snowy environments, provides excellent insulation.
- How: Pile snow into a mound, let it set, then hollow it out. Ensure ventilation.
- Natural Shelters: Overhangs, caves (check for animal inhabitants), hollow logs, dense thickets.
- Explanation: Utilize what nature provides to save energy.
- Lean-to: Simplest, but only protects from one side. Requires a sturdy branch or fallen tree.
- Insulation:
- Ground Insulation: Crucial. Lie on a thick layer of leaves, pine needles, or dry grass (at least 6-12 inches) to prevent heat loss to the ground.
- Personal Insulation: Wear layers of clothing, including a hat. Use your emergency blanket.
- Fire (Within Shelter, if Safe): A small, controlled fire can provide warmth and psychological comfort, but ensure proper ventilation to avoid smoke inhalation.
Explanation: Shelter protects you from hypothermia (too cold), hyperthermia (too hot), rain, wind, and sun. A well-built shelter can save your life by allowing your body to conserve energy and maintain core temperature.
5. Fire: Your Multi-Purpose Tool
Fire is essential for warmth, water purification, cooking, signaling, and morale.
Key Points:
- Site Selection: Clear a 10-foot radius around your fire pit. Dig a small pit or use a rock ring.
- Materials (The Fire Triangle):
- Tinder: Extremely fine, dry material that catches a spark easily (e.g., dry grass, fine bark shavings, cotton balls, char cloth).
- Kindling: Small twigs (pencil-lead to pencil-sized) that catch fire from tinder.
- Fuel: Larger pieces of wood that sustain the fire.
- Ignition Sources:
- Primary: Waterproof matches, lighter, ferro rod/fire steel (most reliable in wet conditions).
- Backup: Magnifying glass (if sunny), friction methods (bow drill, hand drill – requires significant practice).
- Building the Fire: Start with a small tepee or log cabin structure using tinder and kindling, then add progressively larger fuel.
- Explanation: Practice fire starting in controlled environments before you need it. This fundamental skill significantly increases your chances of survival and can provide psychological comfort.
6. Signaling for Rescue: Don’t Be a Needle in a Haystack
The sooner you are found, the better. Maximize your visibility.
Key Points:
- The “Rule of Threes”: Use signals in sets of three (three fires, three whistles, three flashes). This is a universal distress signal.
- Signal Fire (Smoke): Build a large fire. Add green leaves or damp material to create thick smoke during the day.
- Explanation: Smoke is highly visible from a distance.
- Signal Mirror: Use a small mirror to reflect sunlight towards aircraft or distant searchers. Practice aiming it.
- Explanation: A powerful visual signal on sunny days.
- Whistle: Three short blasts repeated.
- Explanation: Carries further than your voice, especially in dense terrain.
- Ground-to-Air Signals: Create large “SOS” or “X” symbols on the ground using rocks, logs, or clothing, visible from above.
- Bright Colors: Lay out brightly colored clothing or tarps in an open area.
- Explanation: Make yourself as visible and audible as possible. Conserve energy while signaling, especially if you have a primary location.
Conclusion: Embracing the Wilderness Challenge
Surviving in the wild is a profound challenge, but it’s one that becomes significantly more manageable with knowledge and practice. It’s about understanding nature’s rhythms, respecting its dangers, and harnessing its resources. By mastering the fundamental skills of finding and purifying water, safely identifying and sourcing food, constructing protective shelter, starting fire, and effectively signaling for rescue, you equip yourself not just with tools, but with the confidence and resourcefulness to endure.
Remember, the wilderness is a classroom, and every skill learned is an investment in your safety. Whether you’re a seasoned adventurer or a cautious beginner, these tips provide the essential framework to transform a daunting survival scenario into a testament to human resilience. Stay calm, stay focused, and use your knowledge to find your way home.